Azure AI AgentとAzure AI Searchを連携させたRAG検索の実装ガイド Part2
はじめに
MS開発部の松坂です。
本ブログの第2部では、Part 1で構築した基盤を活用して、実際にRAG検索システムを実装する例を紹介します。
本ブログを通じて、Azure AI FoundryとAzure AI Searchを組み合わせたRAG検索システムを構築する際の参考にしてください。
前提条件
以下の準備が整っていることを確認してください:
-
Part 1で構築したAzure AI Search及びAzure AI Foundryが既に設定されていること。
-
実行環境でEntra ID 認証が設定されていること。
-
Pythonコードが実行できる環境であること。
ライブラリ
|
1 2 |
pip install azure-ai-projects pip install azure-identity |
ソースコード解説
1. Azure AI Agentのクライアント作成および、Azure AI Searchへの接続設定
まず、Azure AI Agentのクライアントを作成し、
作成したクライアントをもとにAzure AI Searchに接続するための設定を行います。
|
1 2 3 4 5 6 7 8 9 10 11 12 13 14 15 16 |
<span class="token token">from</span> azure<span class="token token punctuation">.</span>ai<span class="token token punctuation">.</span>projects <span class="token token">import</span> AIProjectClient <span class="token token">from</span> azure<span class="token token punctuation">.</span>identity <span class="token token">import</span> DefaultAzureCredential <span class="token token">from</span> azure<span class="token token punctuation">.</span>ai<span class="token token punctuation">.</span>projects<span class="token token punctuation">.</span>models <span class="token token">import</span> AzureAISearchTool connection_string <span class="token token operator">=</span> '' connection_name = '' index_name = '' project_client <span class="token token operator">=</span> AIProjectClient<span class="token token punctuation">.</span>from_connection_string<span class="token token punctuation">(</span> credential<span class="token token operator">=</span>DefaultAzureCredential<span class="token token punctuation">(</span><span class="token token punctuation">)</span><span class="token token punctuation">,</span> conn_str<span class="token token operator">=</span>connection_string <span class="token token punctuation">) </span> ai_search_connection = project_client.connections.get( connection_name=connection_name ) ai_search = AzureAISearchTool(index_connection_id=ai_search_connection.id, index_name = index_name) |
ポイント解説
- 接続情報の設定:
-
-
connection_string………Azure AI Foundryの接続文字列を設定します。
-
connection_name………Azure AI HubのConnected ResourcesにあるAzure AI Searchの名前を設定します。
- index_name………Azure AI Searchで作成したインデクサーの名前を設定します。
-
-
検索ツールのインスタンス化:
-
指定した接続名に基づいて、Azure AI Projectの接続情報を取得します。
-
取得した接続情報を用いて、AzureAISearchToolのインスタンスを作成します。 このインスタンスを使って、指定したインデックスに対する検索を行うことができます。
-
2. エージェントの作成とチャットの実行
作成したクライアントからエージェントを作成し、チャットを実行し、その結果を表示するところまでになります。
|
1 2 3 4 5 6 7 8 9 10 11 12 13 14 15 16 17 18 19 20 21 |
agent = project_client.agents.create_agent( model="gpt-4o-mini", name="my-assistant", instructions="You are a helpful assistant", tools=ai_search.definitions, tool_resources=ai_search.resources, headers={"x-ms-enable-preview": "true"}, ) thread = project_client.agents.create_thread() input_message = input("実行してほしい内容を書いてください:") message = project_client.agents.create_message( thread_id=thread.id, role="user", content=input_message, ) run = project_client.agents.create_and_process_run(thread_id=thread.id, assistant_id=agent.id) for data_point in reversed(messages.data): last_message_content = data_point.content[-1] role = data_point.role.value print(f"{role}: {last_message_content.text.value}") |
ポイント解説
-
エージェントの作成:
-
create_agentで新しいエージェントを作成します。その際は先ほどのAzureAISearchToolのインスタンスを指定するようにします。
-
modelには、Azure AI Foundryで設定したモデルを設定します(例:gpt-4o-mini)
-
-
メッセージ作成:
-
ユーザーに実行してほしい内容を変数に格納し、 create_messageにてユーザーメッセージをエージェントに設定します。
-
新しいスレッドを作成し、スレッドとメッセージ情報を紐づけます。
-
-
エージェントの実行:
-
create_and_process_run: エージェントがメッセージを処理して応答を生成するための実行を開始します。
-
エージェントからのメッセージのリストを取得し、最後の応答結果を出力します
-
結果
今回は試しに以下サイトのGitHubのプロジェクトにあるデータを使ったインデクサーをもとに検索をしてみました。 Azure で ChatGPT × Cognitive Search を使ったエンタープライズサーチを実現 #LangChain – Qiita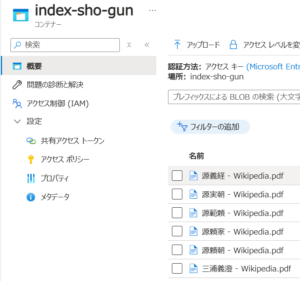
まとめ
エージェントによるRAG検索システムの実装について細かく解説しました。
様々なエージェントを構築する上でRAG検索も欠かせない存在なので、実装するうえでの参考になれば幸いです。今後はResponse APIがリリースされることで、さらにRAG検索システムの精度向上に期待が持てそうです。
以上、最後までご愛読いただき
ありがとうございました。
お問い合わせは、
以下のフォームへご連絡ください。
関連記事

この著者の保持資格