Graph APIをAIに使わせる!Azure AI Agentの関数呼び出し活用術

目次
はじめに
MS開発部の松坂です。
Azure OpenAI Serviceでは、「関数呼び出し(Function Calling)」機能を使って、AIが外部サービスに動的にアクセスすることができます。
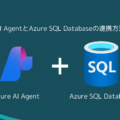
本記事では、Azure AI AgentとMicrosoft Graph APIを連携し、AIにOutlookメール情報を取得させる方法を解説します。
C#で実装し、AIから安全にGraph APIを操作できる構成を構築します。
「業務に合わせたAIエージェントを作ってみたい」「API呼び出しをAIにやらせたい」
そんな方におすすめの内容です。
構成概要
-
Azure AI Agent Service
-
Outlook(Microsoft Graph API経由でメール情報取得)
-
C# SDK
1. 事前準備
-
Azureサブスクリプション
-
Azure AI Agent Serviceのプロジェクト作成
-
Microsoft Graph APIのアプリ登録(Outlookメールアクセス権限付与)
-
必要なNuGetパッケージのインストール(例:
Azure.Identity,Microsoft.Graph,azure.ai.projects等)
2. Outlookのメールを取得する関数の作成
Azure AI Agentの関数呼び出しを用いてOutlookのメール情報を取得する関数を作成します。 まずはエージェントとGraph APIを連携するために必要な検索パラメータのDTOクラスを作成します。今回は簡易的なものとして、送り先と時刻でチャット検索できるように構築します。|
1 2 3 4 5 6 7 8 9 10 |
public class MailSearchDto { -----------------省略--------------- public string? From { get; set; } public DateTime? AfterDate { get; set; } public DateTime? BeforeDate { get; set; } -----------------省略--------------- } |
|
1 2 3 4 5 6 7 8 9 10 11 12 13 14 15 16 17 18 19 20 21 22 23 24 25 26 27 28 29 30 31 32 33 34 35 36 37 38 39 40 41 42 43 44 45 46 |
using Microsoft.Graph; using Microsoft.Kiota.Abstractions.Authentication; public async Task<string> GetMailData(Models.MailSearchDto request, string incomingToken) { var filters = new List<string>(); -----------------省略--------------- if (!string.IsNullOrEmpty(request.From)) { filters.Add($"from/emailAddress/address eq '{request.From}'"); } if (request.AfterDate.HasValue) { filters.Add($"receivedDateTime ge {request.AfterDate.Value.ToUniversalTime():o}"); } if (request.BeforeDate.HasValue) { filters.Add($"receivedDateTime le {request.BeforeDate.Value.ToUniversalTime():o}"); } CustomTokenProvider provider = new CustomTokenProvider(); provider.token = incomingToken; var authenticationProvider = new BaseBearerTokenAuthenticationProvider(provider); var graphClient = new GraphServiceClient(authenticationProvider); var filterQuery = filters.Any() ? string.Join(" and ", filters) : ""; var result =(filterQuery =="")? await graphClient.Me.Messages.GetAsync() : await graphClient.Me.Messages.GetAsync((request) => { request.QueryParameters.Filter = filterQuery; }); var sb = new StringBuilder(); foreach (var msg in result.Value) { sb.AppendLine($"From: {msg.From?.EmailAddress?.Address}"); sb.AppendLine($"Subject: {msg.Subject}"); sb.AppendLine($"Received: {msg.ReceivedDateTime}"); sb.AppendLine(); } return sb.ToString(); } public class CustomTokenProvider : IAccessTokenProvider { public string token { get; set; } public AllowedHostsValidator AllowedHostsValidator => throw new NotImplementedException(); public Task GetAuthorizationTokenAsync(Uri uri, Dictionary<string, object>? additionalAuthenticationContext = null, CancellationToken cancellationToken = default) { return Task.FromResult(token); } } |
|
1 2 3 4 5 6 7 8 9 10 11 12 13 14 15 16 17 18 19 20 21 22 23 24 25 26 27 28 29 30 31 32 33 |
FunctionToolDefinition getMailDataTool = new( name: "getMailData", description: "検索したい情報からメール情報を取得します。", parameters: BinaryData.FromObjectAsJson( new { Type = "object", Properties = new { -----------------省略--------------- From = new { Type = "string", Description = "差出人のメールアドレス" }, AfterDate = new { Type = "string", Description = "指定日以降のメール" }, BeforeDate = new { Type = "string", Description = "指定日以前のメール" } -----------------省略--------------- } }, new JsonSerializerOptions() { PropertyNamingPolicy = JsonNamingPolicy.CamelCase } ) ); |
|
1 2 3 4 5 6 7 8 9 10 11 12 13 14 15 16 17 18 19 20 21 22 23 24 25 26 27 28 29 30 31 32 33 |
async Task GetResolvedToolOutput(RequiredToolCall toolCall,string incomingToken) { if (toolCall is RequiredFunctionToolCall functionToolCall) { using JsonDocument argumentsJson = JsonDocument.Parse(functionToolCall.Arguments); if (functionToolCall.Name == getMailDataTool.Name) { MailSearchDto mailSearchDto = new MailSearchDto(); -----------------省略--------------- if (argumentsJson.RootElement.TryGetProperty("from", out var fromProp)) { mailSearchDto.From = fromProp.GetString(); } if (argumentsJson.RootElement.TryGetProperty("afterDate", out var afterDateProp)) { if (DateTime.TryParse(afterDateProp.GetString(), out var afterDate)) { mailSearchDto.AfterDate = afterDate; } } if (argumentsJson.RootElement.TryGetProperty("beforeDate", out var beforeDateProp)) { if (DateTime.TryParse(beforeDateProp.GetString(), out var beforeDate)) { mailSearchDto.BeforeDate = beforeDate; } } return new ToolOutput(toolCall.Id, await GetMailData(mailSearchDto, incomingToken)); } } return null; } |
3. Azure AI Agent のエージェント作成
次にAzureAIAgentのクライアント初期化からエージェント作成を行います。|
1 2 3 4 5 6 7 |
using Azure.Identity; using Azure.AI.Projects; var connectionString = Environment.GetEnvironmentVariable("PROJECT_CONNECTION_STRING"); var credential = new DefaultAzureCredential(); var projectClient = AIProjectClient.FromConnectionString(credential, connectionString); |
※接続文字列はAzureポータルから取得し、環境変数に設定してください。
|
1 2 3 4 5 6 7 8 |
Response agentResponse = await projectClient.CreateAgentAsync( model: "gpt-4o", name: "SDK Test Agent - Functions", instructions: "あなたはメールを検索するエージェントです。指示された内容で検索を行い、簡潔に回答をまとめてください。", tools: new List { getMailDataTool } ); Agent agent = agentResponse.Value; |
エージェント作成時には、先ほど定義したメール取得用のFunctionToolDefinitionをtoolsとして設定します。
4. スレッドの作成
|
1 2 3 4 5 6 7 8 9 |
Response threadResponse = await projectClient.CreateThreadAsync(); AgentThread thread = threadResponse.Value; threadID = thread.Id; Response messageResponse = await projectClient.CreateMessageAsync( thread.Id, MessageRole.User, userMessage); ThreadMessage message = messageResponse.Value; |
スレッド作成から、ユーザーメッセージ作成までは基本的な形と変わりません。
※userMessageには任意の質問するチャット内容を入れてください。5. メール取得クエリの実行
|
1 2 3 4 5 6 7 8 9 10 11 12 13 14 15 16 17 18 19 20 21 22 23 24 25 26 27 28 29 30 31 32 33 34 35 36 37 |
Response runResponse = await client.CreateRunAsync(thread, agent); // この部分は、ツール実行とポーリング処理のループです。 // 必要に応じてエージェントからのアクションを処理します。 do { await Task.Delay(TimeSpan.FromMilliseconds(500)); runResponse = await projectClient.GetRunAsync(thread.Id, runResponse.Value.Id); if (runResponse.Value.Status == RunStatus.RequiresAction && runResponse.Value.RequiredAction is SubmitToolOutputsAction submitToolOutputsAction) { List toolOutputs = new(); // ツールの実行が要求された場合、各ツール呼び出し(toolCall)に対して対応する出力を取得します。 // ここでは、事前に定義したGetResolvedToolOutput関数を使って、Graph APIによるメール検索を実行します。 foreach (RequiredToolCall toolCall in submitToolOutputsAction.ToolCalls) { toolOutputs.Add(await GetResolvedToolOutput(toolCall, token)); } runResponse = await projectClient.SubmitToolOutputsToRunAsync(runResponse.Value, toolOutputs); } } while (runResponse.Value.Status == RunStatus.Queued || runResponse.Value.Status == RunStatus.InProgress); // 最新のメッセージを取得 Response<PageableList> messagesResponse = await client.GetMessagesAsync(thread.Id); IReadOnlyList messages = messagesResponse.Value.Data; // エージェントの応答メッセージ(Role: agent)の中で最も新しいものを取得します。 ThreadMessage? lastAssistantMessage = messages .OrderByDescending(m => m.CreatedAt) .FirstOrDefault(m => m.Role == MessageRole.Agent); if (lastAssistantMessage != null && lastAssistantMessage.ContentItems.FirstOrDefault() is MessageTextContent textContent) { Console.WriteLine(textContent.Text); } |
C#では先ほど作成したヘルパー関数をエージェント実行中に呼び出すよう設定をする必要があります。
ツールの実行状態および、エージェントの実行状態を見て適切なエラー処理やレスポンスの設定を行ってください。
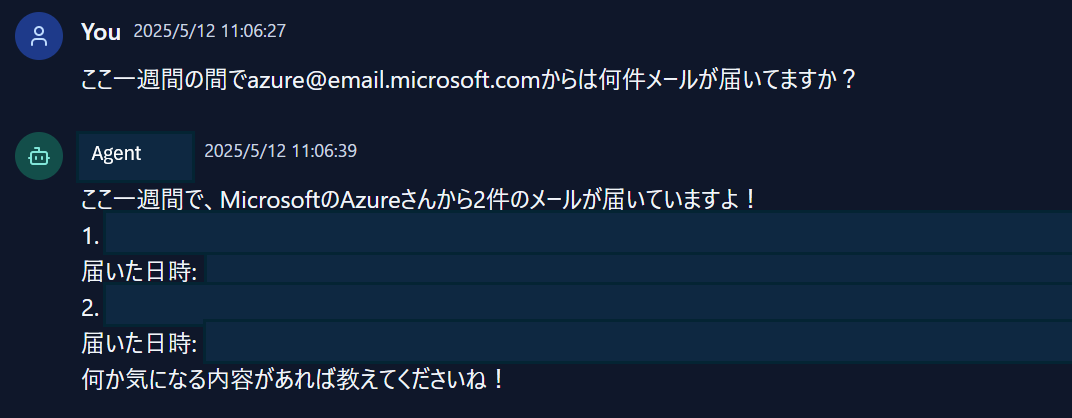
6. 動作例
今回は動作確認の例としてReact+TypeScriptでトークンを取得し、上記内容をバックエンドでAPI通信を通じて送受信処理を実行します。
MSALを使ってサインインし、トークンを取得して実行します。
|
1 2 3 4 5 6 7 8 9 10 11 12 |
// src/authConfig.ts export const msalConfig = { auth: { clientId: "YOUR_CLIENT_ID", authority: "https://login.microsoftonline.com/YOUR_TENANT_ID", redirectUri: "http://localhost:3000", }, }; export const loginRequest = { scopes: ["User.Read", "Mail.Read"], }; |
Graph API呼び出しの例
|
1 2 3 4 5 6 7 8 9 10 11 12 13 14 15 16 17 18 19 20 21 22 23 24 |
import { useMsal } from "@azure/msal-react"; ---省略--- const { instance, accounts } = useMsal(); const response = await instance.acquireTokenSilent({ ...loginRequest, account: accounts[0], }); const data = await getInboxMails(response.accessToken); ---省略--- // 指定されたアクセストークンを使って、バックエンド経由でメール検索エージェントにリクエストを送信します。 // `content` にはユーザーの検索メッセージ(例: "5月以降の〇〇さんからのメールを教えて")を渡します。 export async function getInboxMails(accessToken: string) { const response = await fetch( "/agent/send", { method: "POST", headers: { Authorization: `Bearer ${accessToken}`, }, body: JSON.stringify({ message: content }) } ); return response.json(); } |
7. おわりに
本記事では、Azure OpenAIのFunction Calling機能を使い、AIエージェントがC#経由でGraph APIを呼び出し、Outlookメールを動的に取得する方法を紹介しました。
このアプローチにより、業務に最適化された独自のAIアシスタントを構築することが可能になります。
Graph APIを使えば、メールだけでなく予定表、連絡先、ユーザー情報などへのアクセスも可能です。
AIとAPIの橋渡しをすることで、実用的かつ拡張性の高いAIエージェントが生まれます。
次は、メール要約、重要度判定、Teams連携など、用途に応じて機能を拡張してみてください。
以上、最後までご愛読いただき
ありがとうございました。
お問い合わせは、
以下のフォームへご連絡ください。
関連記事


この著者の保持資格